Quick Deployment on AWS
This topic describes how to perform a quick deployment on AWS. If you want to create a cluster for a production environment, you need to configure and run a manual deployment instead.
Quick deployment launches a CloudFormation template to help you create the required credentials and provision and configure the necessary AWS resources.
Quick Deployments are not suitable for production use, and are recommended for non-production use only.
Quick Deployments do not support all of the possible configuration options that can be used with manual deployments. Use the manual deployment method if you need to:
- reuse existing data credentials
- reuse deployment credentials
- create new data or deployment credentials
- manually configure network access
- Enable Multi-AZ
The CloudFormation stack includes:
- An EC2 security group, which acts as a virtual firewall to control the traffic that is allowed to and from the AWS resources with which the security group is associated. The security group ensures that only traffic from PhoenixAI reaches the AWS resources allocated for your PhoenixAI cluster.
- An S3 bucket, which stores the query profile information for your PhoenixAI cluster.
- IAM roles, which are granted permissions that allow your PhoenixAI cluster to access the related AWS resources.
- A VPC and a subnet, on which your PhoenixAI cluster resides.
To learn more about AWS CloudFormation, see What is AWS CloudFormation?
With similar procedures, you can deploy a PhoenixAI cluster into a new or existing VPC.
Start the deployment wizard
Follow these steps to start the deployment wizard:
- Sign in to the PhoenixAI Cloud console.
- On the Clusters page, click Create cluster.
- In the dialog box that is displayed, choose Classic cluster or Elastic cluster, choose AWS as your cloud provider, and then click Next.
Configure and run a quick deployment
After you start the deployment wizard, you only need to finish STEP1. PhoenixAI will finish the remaining steps.
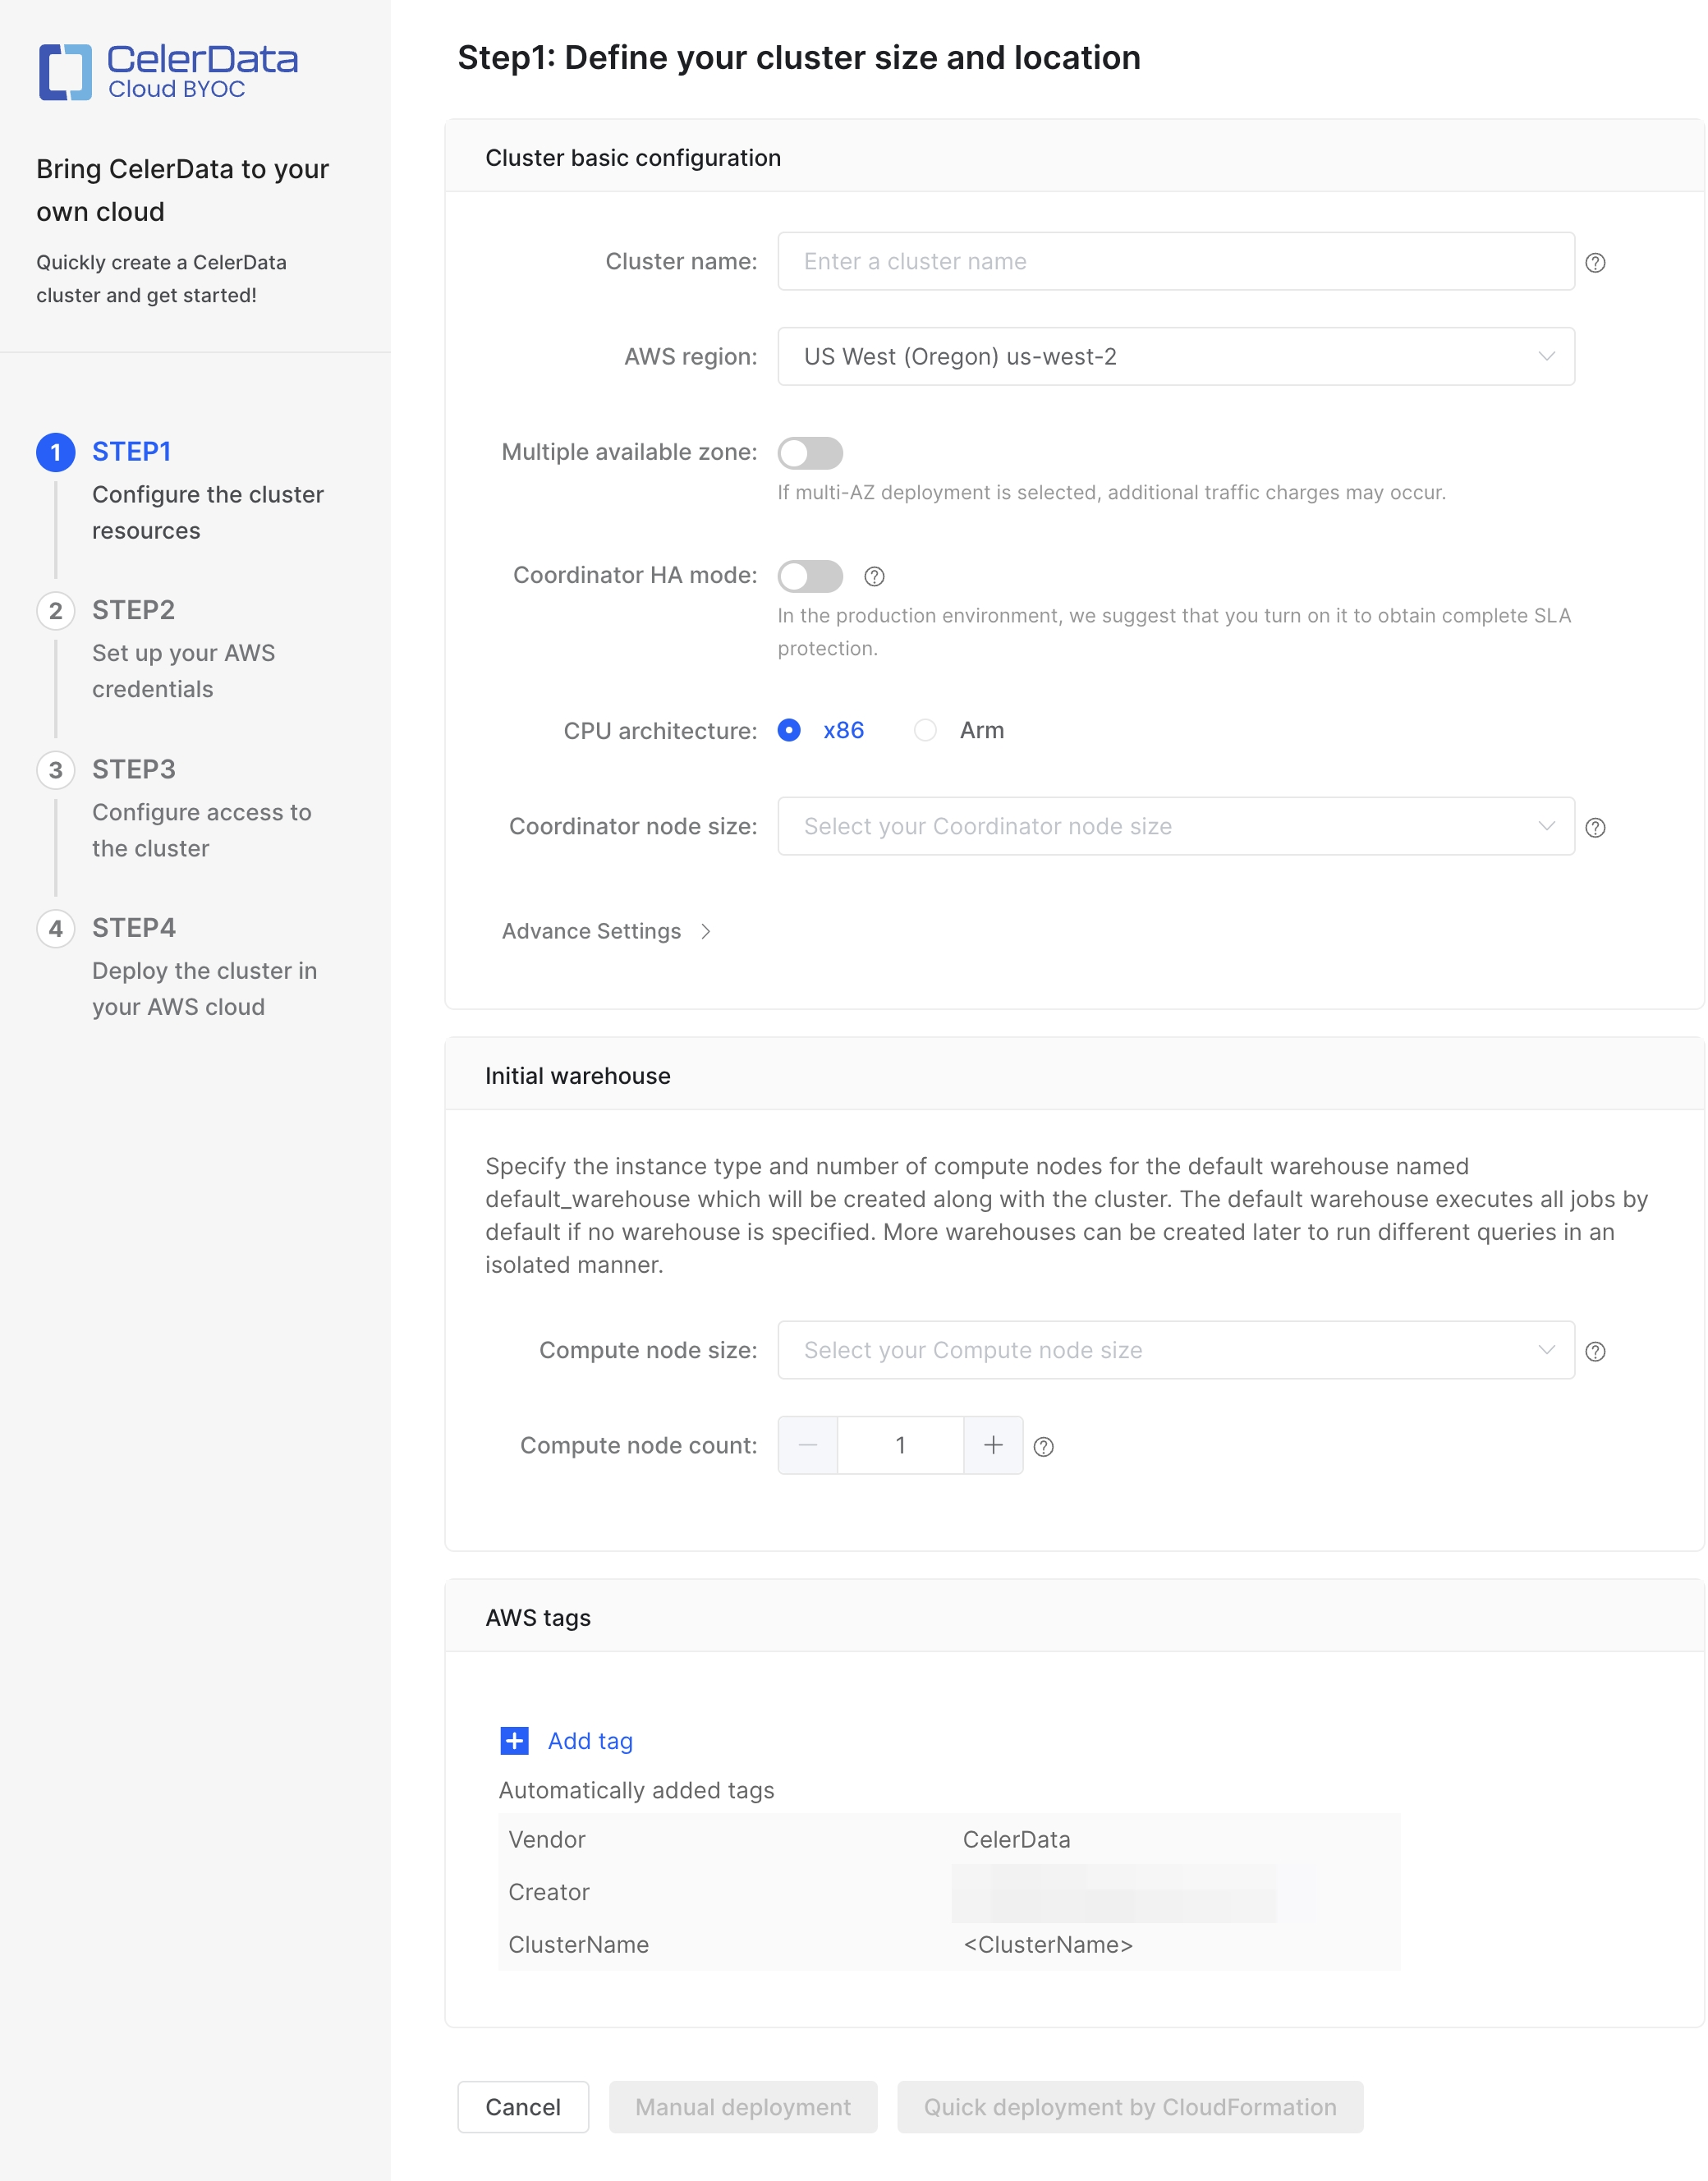
Configure cluster resources
In STEP1: Configure the cluster resources, configure the cluster based on your business requirements, and optionally click Add tag to add one or more tags to the cluster. Then, click Quick deployment by CloudFormation to continue. The tags you add here will be attached to the AWS cloud resources associated with the cluster.
- PhoenixAI provides a Free Developer Tier. To use it, you must select instance types that provide 4 CPU cores and 16-GB RAM.
- 4 CPU cores and 16-GB RAM are also the minimum configuration package for PhoenixAI nodes.
Configure the following configuration items.
| Parameter | Required | Description |
|---|---|---|
| Cluster name | Yes | Enter the name of the cluster. The name cannot be changed after the cluster is created. We recommend that you enter an informative name that can help you identify the cluster with ease at a later time. |
| AWS region | Yes | Select the AWS region that hosts the cluster. For information about the regions supported by PhoenixAI, see Supported cloud platforms and regions. |
| PhoenixAI enterprise version | Yes | Select the PhoenixAI enterprise software (database kernel) version. You can select between the Latest Stable, Latest GA, and Latest Preview versions. For more information, see Beta and Experimental features. |
| Multiple availability zone | No | Enable or disable Multiple Availability Zone (Multi-AZ) deployment. This feature is disabled by default. For more information about PhoenixAI's Multi-AZ Deployment, see Multi-AZ Deployments. Currently, quick deployment by CloudFormation does not support Multiple Availability Zone. You can enable this feature only via manual deployment. |
| Coordinator node count | No | Select the number of Coordinator Nodes you want to deployed across the availability zones. This field is available only when Multi-AZ deployment is enabled. You can select 3 (Default) or 5 Coordinator Nodes. |
| Coordinator HA mode | No | Enable or disable the coordinator HA mode. This field is available only when Multi-AZ deployment is disabled. The coordinator HA mode is disabled by default.
|
| Coordinator node size | Yes | Select an instance type for the coordinator nodes in the cluster. For information about the instance types supported by PhoenixAI, see Supported instance types. |
| Node Distribution Policy | Yes | Select a Compute Node distribution policy for the default warehouse in the cluster. This field is available only when Multi-AZ deployment is enabled. For more information about the node distribution policies of Multi-AZ Deployment, see Multi-AZ Deployments. |
| Compute node size | Yes | Select an instance type for the compute nodes of the default warehouse in the cluster. For information about the instance types supported by PhoenixAI, see Supported instance types. |
| Compute node count | Yes | Specify the number of compute nodes for the default warehouse in the cluster. You can determine the number of compute nodes based on the amount of data to process. The default value is 1. Note If you choose Multi AZ as the Node Distribution Policy, this value represents the number of compute nodes for each Compute Node Group in the warehouse. The warehouse will have two Compute Node Groups deployed separately in two selected AZs. |
| Compute storage size | No | Specify the storage size for the compute nodes of the default warehouse. You can also customize the number of volumes by ticking the box next to this field. This field is available for EBS-backed instance types only. |
| Compute disk IOPS | No | Specify the disk IOPS for the compute nodes of the default warehouse. This field is available for EBS-backed instance types only. Range: [3000, 16000] |
| Compute disk throughput | No | Specify the disk throughput for the compute nodes of the default warehouse. This field is available for EBS-backed instance types only. Range: [150, 1000] |
In Advance Settings, you can:
-
Enable Termination Protection.
You can enable Termination Protection to prevent the cluster from being deleted accidentally, thus eliminating the risk of data loss. Once Termination Protection is enabled for a cluster, any attempt to delete the cluster will fail and an error will be returned. To delete the cluster, you will need to manually disable Termination Protection first.
After the cluster is created, you can enable or disable this feature in the Cluster Configuration section on the Cluster parameters tab of the cluster details page.
-
Define a storage autoscaling policy for Coordinator Nodes in Elastic clusters.
Storage autoscaling is enabled by default. PhoenixAI will automatically scale up the storage size based on the policy when it detects that you are running out of the preset storage space.
noteKeeping storage autoscaling enabled is strongly recommended if your cluster has an unpredictable workload, which can exhaust the storage quickly and thereby cause critical cluster failures.
To define a storage autoscaling policy, follow these steps:
-
Set the storage usage threshold (in percentage) that triggers an autoscaling operation. You can set this threshold between 80% to 90%. When the storage usage of a node reached this threshold and lasted for over five minutes, PhoenixAI will scale up its storage by the step size you defined in the following procedure.
-
Set the step size of each autoscaling operation. You can choose to set the step size in fixed size (GB) or percentage, for example, 50 GB or 15% (of the original storage size).
-
Set the maximum storage size of each node. PhoenixAI will stop scaling up the storage when its size reaches this threshold.
note- A minimum of six hours is mandatory as the interval between two scaling operations (including manual scaling and autoscaling).
- The maximum size of each storage is 16 TB.
- Compute Nodes in Elastic clusters do not support storage autoscaling.
-
Launch resources in AWS
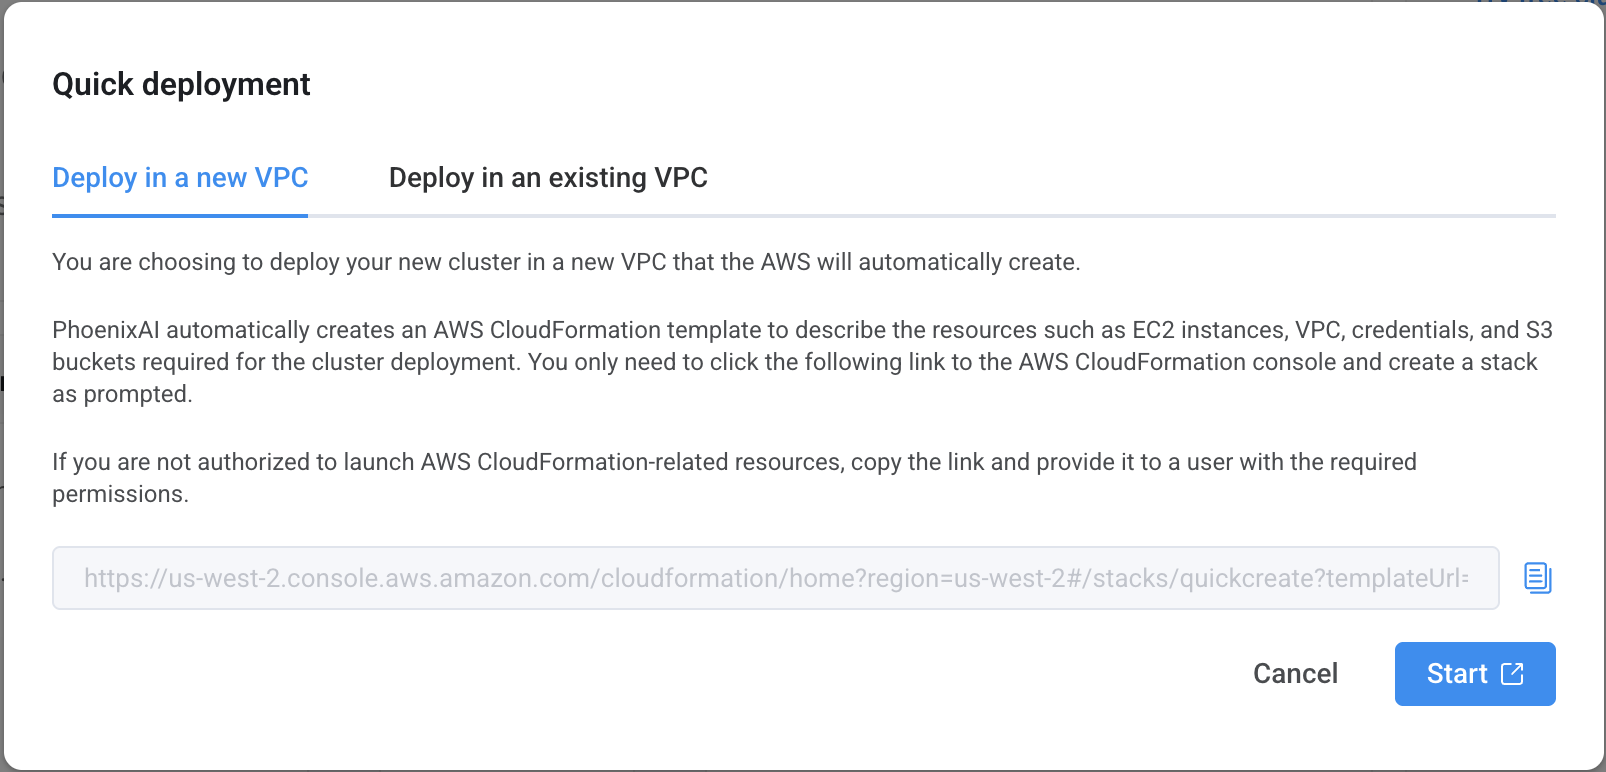
-
On the Quick deployment dialog box, choose Deploy in a new VPC or Deploy in an existing VPC and click Start.
noteIf you do not have the permissions on AWS CloudFormation, click the Copy icon next to the displayed URL and provide the URL to an authorized user, who can then use the URL to open the AWS CloudFormation console and create a stack for you.
-
On the AWS login page, enter your account information and click Sign in.
You are directed to the AWS CloudFormation console.
-
On the Quick create stack page, perform the following operations:
a. In the Stack name section, specify the stack name.
b. In the Cluster Configuration section, specify the cluster name. We recommend that you retain the cluster name you have specified in PhoenixAI. Then, enter a password, and confirm the password.
c. In the Storage Configuration section, specify the S3 bucket name.
d. In the Network Configuration section, specify the VPC name (if you choose to deploy the cluster into a new VPC), or select a VPC and then a subnet from that VPC (if you choose to deploy the cluster into an existing VPC).
e. In the Capabilities section, read the message and select I acknowledge that AWS CloudFormation might create IAM resources with custom names.
f. Click Create stack.
-
Return to the PhoenixAI Cloud console, and click Finish in the Finish the AWS CloudFormation creation message.

-
Refresh the Clusters page until you see the cluster you have created.
-
If the cluster is in the Deploying state, the cluster deployment has not finished. You can click Deploying to view the deployment progress.
When the cluster deployment is complete, PhoenixAI displays a message that reads "PhoenixAI Cluster has been successfully deployed in your AWS Cloud!" You can click Preview cluster below the message to view the cluster.
-
If the cluster is in the Running state, the cluster deployment has finished. You can click the cluster to view it.
-
What's next
At any time, you can connect to the cluster from a JDBC driver or a MySQL client or by using the PhoenixAI Studio. For more information, see Connect to a PhoenixAI cluster.
You can also view and manage the cluster to your needs in the PhoenixAI Cloud console: